|
Operations > Automated Trading > Automated Trading Interface (ATI) > TradeStation Integration > Email Interface > Set Up |

  
|
|
Operations > Automated Trading > Automated Trading Interface (ATI) > TradeStation Integration > Email Interface > Set Up |
|
|
The following set up is for TradeStation Version 8.XX. This section will walk you through the set up in both NinjaTrader and TradeStation as well as allow you to send a test email through the Email Interface you have created.
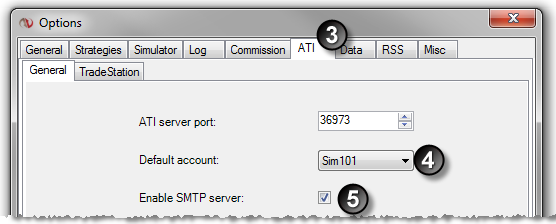
Setting up NinjaTrader 1. Start NinjaTrader 2. Select the Tools menu and then the menu item Options from the Control Center window 3. Once in the Options window select the ATI tab
4. Set the default account to Sim101 (you can always set this to your live brokerage account later but we recommend leaving it to Sim101) 5. Check the "Enable SMTP server" option 6. Set your Order Handling options 7. Set your Stop Order Handling options 6. Connect to your broker by selecting the File menu and then the menu item Connect within the Control Center window (make sure you have set up a connection to your broker) 7. Enable the Automated Trading Interface by selecting the File menu and then the menu item AT Interface within the Control Center window
Symbol Mapping for Futures Contracts (Stocks and Forex traders may skip this step) 8. Set your symbol mapping for futures contracts
Setting Up Antivirus Software 9. Antivirus software which scans outgoing emailing can impair the link between TradeStation and NinjaTrader. If your PC has Antivirus software installed and scans outgoing mail, each mail notification sent from TradeStation to NinjaTrader will be scanned and therefore add significant delay in automatically processing your trading signals. Please consult your Antivirus software Help Guide to determine how to disable the scanning of outgoing email.
Setting Up TradeStation Workspace 10. Start TradeStation 11. Set up your workspace options
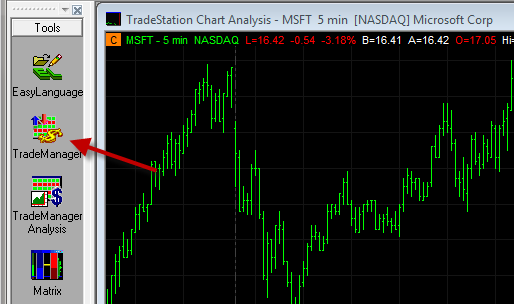
Setting Up TradeStation Email Notification 12. Add a TradeManager window to your workspace by clicking on the icon on the left pane as per the image below.
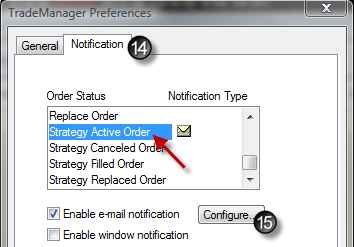
13. Click once on the TradeManager window that appears then select the TradeStation main menu View and the menu name TradeManager preferences 14. Select the "Notification" tab as per the image below and then select "Strategy Active Order"
15. Press the "Configure..." button to bring up the "Messaging" window
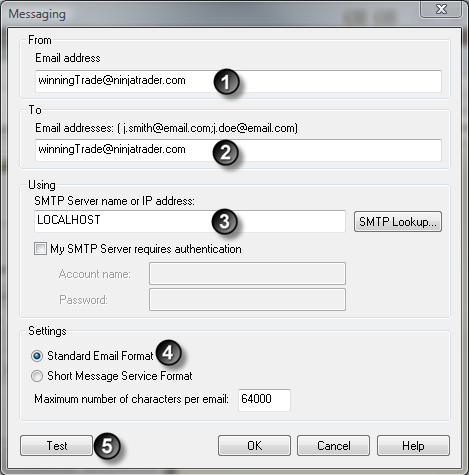
16. Enter the information exactly as shown above in items 1 through 4; you can press the "Test" button which will send a test message to NinjaTrader and show up in the Control Center Log tab. If you receive an error when attempting to send a test message, please ensure that you have no other SMTP server running on your PC and make sure that any competitive products are uninstalled. 17. Press "OK" 18. Repeat steps 15 through 17 for "Strategy Canceled Order", "Strategy Filled Order" and "Strategy Replaced Order"
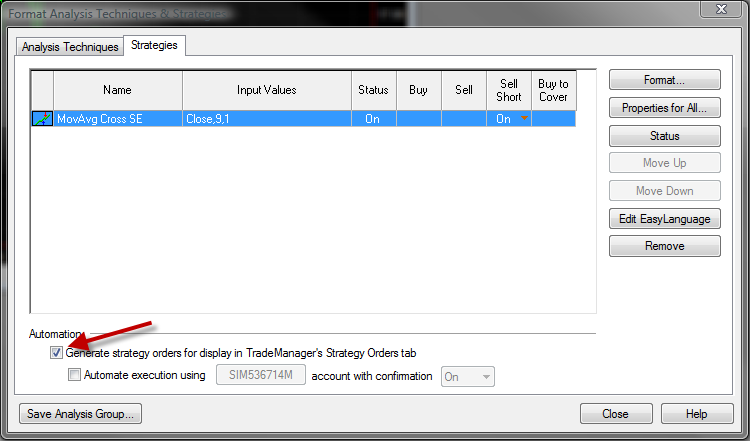
Setting Up a TradeStation Strategy 19. Open a chart(s) of the instrument that you will run your strategy on 20. Right click in the chart and select the menu name "Insert Strategy..." and select a strategy
21. Your strategy will appear in the "Format Analysis Techniques & Strategies" window as shown above 22. Check the "Generate strategy orders for display in TradeManager's Strategy Orders tab" box and press "Close"
* Following this set up procedure, orders will NOT be sent to any live TS brokerage account, only to NinjaTrader.
That's it! Your strategy will now be automated for execution through NinjaTrader! |