|
The Market Analyzer window allows you to display a variety of real-time quotes, indicator values, and position information on multiple instruments. You can add, remove, and organize individual instrument rows, Instrument Lists, Label rows, Blank rows, and a Total row with the instructions listed below.

Adding an Instrument
You can add an instrument to the Market Analyzer through one of the techniques below:
| • | Press down on your right mouse button in the Market Analyzer window and select the menu item . Select the instrument you want to add inside the Select Instrument window and press the OK button to add the instrument. |
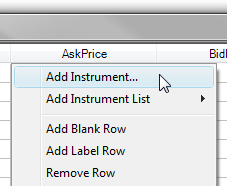
| • | Double left mouse click in a row under the Instrument column to get a flashing text cursor. After the cursor is showing in the row you can type in the symbol of your choice and press enter to add the instrument. |
Adding an Instrument List
You can rapidly add a list of instruments to the Market Analyzer window.
| • | Press down on your right mouse button in the Market Analyzer window and select the menu . Then select the Instrument list you would like to add to the Market Analyzer. Please see the Instrument Manager section of the user help guide for additional information on creating, editing, and deleting Instrument lists. |
NOTE: It is more efficient to add instruments after defining the columns of your Market Analyzer window. This will minimize NinjaTrader re-loading historical data into the Market Analyzer window.
|
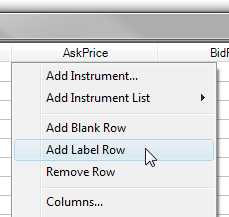
Label rows are user defined and can be used to separate groups of instruments in any way (by asset class, instrument list, etc.).
Adding Label Rows in the Market Analyzer Window
Press down on your right mouse button inside the Market Analyzer window and select the menu . Once the Label row is added you can type in any user defined name.
Dynamic Sorting within Label Rows
Instruments you drag or add under a Label row will "auto-sort" with only the other instruments under the same Label row. For example, if you have one Label row for futures and one for stocks, when you sort the columns, the instruments listed under the futures label would be sorted only against other instruments under the futures label, while instruments under the stocks label would be sorted only against instruments under the stocks label. For more information on ranking and sorting within the Market Analyzer see the Dynamic Ranking and Sorting section of the user help guide.
Aligning a Label Row
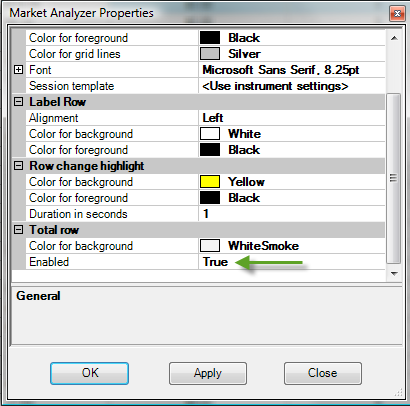
The label of a Label Row can be aligned to the left, center or right of the row. This is done by right mouse clicking within the Market Analyzer and selecting the menu. Change the property Alignment to either "Left", "Center", or "Right".
|
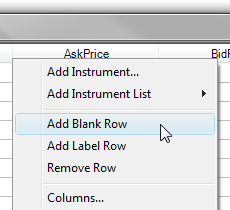
Adding Blank rows to the Market Analyzer window
Blank rows can be used to create space between instruments in the Market Analyzer window or if you need to add more instruments. To add a Blank row press down on your right mouse button in the Market Analyzer window and select the menu . The Blank row will be added above the row you right clicked in.
|
Moving Rows in the Market Analyzer Window
Instrument, Label and Blank rows can all be moved up or down within the Market Analyzer window. To move a row in the Market Analyzer window press down and hold on your left mouse button in the row you would like to move and drag it to the new location. When your cursor is hovering over the new desired location release your left mouse button to set the row down in the new location.
|
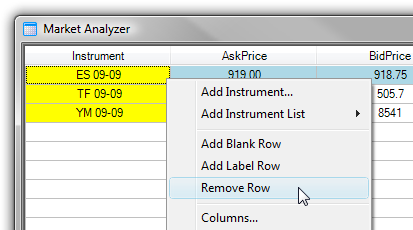
Removing Instrument, Label and Blank Rows
To remove an Instrument, Label or Blank row left mouse click on the row to select it and then press the delete button on your keyboard, or press down on your right mouse button within the row you want to remove and select the menu .
|
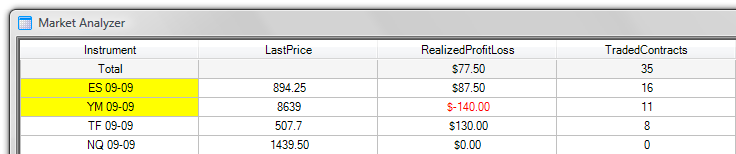
A Total row can total any column of values and is displayed at the top of the Market Analyzer window. For example, you could choose to display your total Realized PnL and total Traded Contracts for all instruments displayed in the Market Analyzer.
|
Adding the Total row to the Market Analyzer window
To add a Total row in the Market Analyzer you must enable both the Total row and the columns you would like totalled with the following steps:
| 1. | Press down on your right mouse button in the Market Analyzer window and select the menu . |
| 2. | In the Properties menu scroll down to the Total Row section and set the property Enabled to . You can also choose to customize the color of this row with the Color for background property. |
| 3. | Press the Apply button to apply the changes or press the OK button to apply the changes and exit the Properties menu.
|
| 4. | To show each column’s total in the Total row press down on your right mouse button inside the Market Analyzer window and select the menu . |
| 5. | Set the Show in Total row property to for each column you want totaled in the Total row. |
| 6. | Press the Apply button to apply the changes or press the OK button to apply the changes and exit the Columns window. |
Removing the Total row from the Market Analyzer window
To remove the Total row press down on your right mouse button inside the Market Analyzer window and select the menu . Scroll down to the Total Row section and set the Enabled property to . Then press the Apply button to apply the changes or press the OK button to apply the changes and exit the Properties window.
|
|
Row Filtering allows you to filter out (hide) rows from the Market Analyzer grid display based on a cell's value. Filter conditions can be setup for any column applied to the Market Analyzer.
To enable Row Filtering:
| 1. | Press down on your right mouse button in the Market Analyzer window and select the menu . |
| 2. | To access the Columns menu where you can add filtering conditions to each column press down on your right mouse button and select the menu . |
For more information on Row Filtering see the Creating Filter Conditions section of the user help guide.
|
|


